
VERSUS: ZBrush Commands (Part II)
- Sarah C Awad and Dhemerae Ford
- Jun 27, 2016
- 5 min read
Remember how we told you not too long ago, that there were a million ways to do the same thing in ZBrush? Well that's still true! So without further ado, welcome to part II of our VERSUS ZBrush Commands series!
Let's get started, shall we?

Unified Skin v DynaMesh
Unified Skin was the precursor to DynaMesh for retopologizing your model's geometry to resolve mesh issues, and to create a more uniform form.
We've spoken about how DynaMesh works in our previous VERSUS post, and Unified Skin essentially does the same thing; however, there are subtle differences between the two. DynaMesh adds a smooth algorithm automatically that streamlines the mesh, whereas in Unified Skin you have a slider that controls how smooth your geometry is. Having control over that option can be handy, as it allows you to make your own lego figures if you set the smooth to 0 (see image below.)

Lego Naga from The Legend of Korra, created using Unified Skin

For contrast, here is the original (a working file)
Another differentiation, is that DynaMesh automatically closes and welds any holes in your model, while Unified Skin creates a loop around the model and gives it an interior shell.

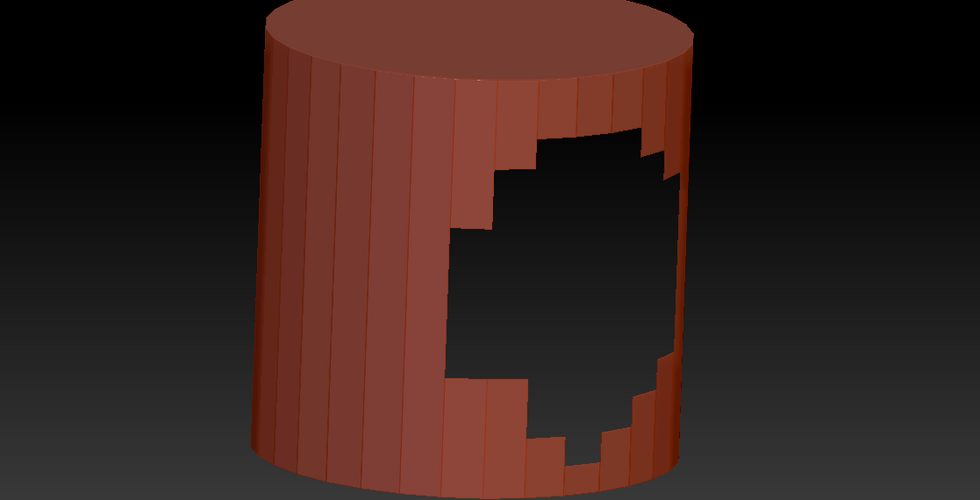


You can also see from the slideshow above that DynaMesh does a better job of keeping the hard edges of the cylinder intact. It uses an algorithm to determine the distribution of polygons so that it retains its shape in the best way under your set preferences. Unified skin has a few options, for it simply tries to give you the most uniform mesh, and in doing so, may end up disregarding certain details in the mesh you may want to keep intact.
In a Nutshell: Once DynaMesh came out, Unified Skin quickly fell out of favor for most ZBrush artists that we know. It is most poignantly used now as a history lesson, and also for making lego-style versions of your mesh. DynaMesh shines for its excellent mesh wrapping algorithm and its basic model repair tools, all built into one shiny button.
InsertMesh v InsertMultiMesh
Both of these commands allow one to insert 3D meshes (that you've turned into a brush) onto a model currently being worked on. From zippers and button, to full dragon skeletons, IM and IMM brushes are a ton of fun to play with, and can save a lot of modeling time on micro detail work.

IMM insert layout when "M" is pressed
The difference between Insert Mesh (IM) and Insert MultiMesh (IMM) is the difference between singular and plural; Insert Meshes only have one brush part you can toggle from versus Insert MultiMesh, which consists of a group of brushes that you can toggle between and insert onto your model. Their names speak for themselves, but aside from that, you can identify an IMM from an IM by simply selecting the brush in the brush menu, hovering your cursor over the icon, and pressing M on your keyboard; if a submenu opens with variations and other brush options, you have an IMM on your hands.

In a Nutshell: Since both essentially do the same thing, whichever brush you choose is completely dependent on what your are making- so have fun!
.ztl n .zbp v .zbr

All three of the file names represent different ways to save your Zbrush work, with each allowing versatility depending on how you need your information.
.ztl or ZTool files only saves the 3D model itself, and all the modifications done upon it, including subtools, Polypaint, and subdivisions. This, as we like to say, is the default way to save a 3D model. To save as a .ztl, select the Save As or Save button in the Tool menu, normally located on the right size menu area.
.zbp or ZBrush Project is a mode that saves your 3D model and any interface changes you may make, such as brush modifications, palette changes, and other customizations. This is useful for those who need their interface to look and be a specific way for efficient workflow, for you will only have to make those framework changes once. To save such a file, select the Save or Save As in the File menu on the top bar of the program.
.zbr of ZBrush Document is used when you are working with "2D or a flat image," meaning that you are working in ZBrush's 2D "painting" mode, outside of Edit mode, when Draw is solely selected. This file type can only be opened in ZBrush, so if you need a .pdf for example, that same Document menu
Open up the Document menu stationed on the top bar of the program, and hit Save or Save As.
Inflate v Inflate Balloon
Inflate and Inflate Balloon are two options within the Deformation menu; both commands allow you to add thickness (X, Y, Z, all three at once) to your entire model or thin, weak walls in need of some bulk. Both tools are vital in the model repairing process for 3D printing, for if your walls are not sturdy enough, material dependent, your model can collapse or become severely delicate.

The biggest difference between these two is the way in which they thicken the model. Inflate does a better job at maintaining the shape of the model; it almost acts as if the thickening is happening from the inside, evenly distributed along the inner wall of the model. On the other hand, Inflate Balloon more easily looses the shape of the model quite quickly, as it expands the model in a spherical way, as if there is a balloon centered inside the model that slowly expands.
In a Nutshell: Use Inflate for more minor thickening when shape integrity is more necessary, and Inflate Balloon when thickness prioritizes shape that you can sculpt back in later. Or you know, if you want to make balloon animals!

MicroMesh v NanoMesh
These two brushes are actually drastically different, but can be used to yield similar effects. Both take a 3D model and populate and it across the topology of the model (see images below).
Nanomesh, combined with ZModeler, acts as a ramped up version of the InsertMesh tool, which we've introduced above. Compared to DynaMesh, there is a ton more control to be had over the creation of your mesh. For example, you can mask off a section of your model, or polygroup it, then NanoMesh only what's been grouped. Your results can also be modified in real time by adjusting sliders controlling scale, offset, angle, and multiple alignment options.
But if you want things to be less structured, there is also a random distribution slider, which will propagate your NanoMeshes in a naturally random way across the surface of your model, making it great for more realistic texture.

MicroMesh on the left, and NanoMesh on the right
MicroMesh is ultimately an easier tool to use, but has fewer options for customization once the button has been clicked. MicroMesh utilizes the geometry of your mesh, and replaces each polygon with a mesh of your choice, unlike NanoMesh, which propagates in a point-cloud esque way above your base model. The main difficulty of using this method, is that you have to pay attention to both the size and axis that you've built your NanoMesh, as that will determine how it replaces your polygons.
In a Nutshell: MicroMesh can be a very effective tool for quickly, and easily generating chainmail and texture in clothing, whereas NanoMesh, with its random distribution generator, is useful for quickly creating patterns in nature such as stones, crystals and trees (Or if you want more control, you can basically build anything you want using NanoMesh, like this weird brain nut thing I made for one of our 30- Minute Modeling Challenges!)


That's it for this round of "VERSUS: ZBRUSH COMMANDS!"Let us know what commands you want to see paired off in the next battle!