
Comic Con Chronicles: 3D Printed Trident, Part 1
- Sarah C. Awad
- Jul 10, 2017
- 5 min read
Dhemerae and I were going to opt out of New York Comic Con this year. After the chaos of 2016- from the uncertainty of obtaining passes, the blocks-long lines for entry, to the sheer over-saturation of con-goers- we were feeling that the cons (no pun intended) out-weighed the pros- we wanted to have a fun and fulfilling experience, not a stressful and uncomfortable hustle than, and that dampened our desire to attend.
However, once Fan Verification season came around, we became inspired to take more control of our experience, so we purchased passes for Thursday and Friday, and began our preparations for the next 3D Printed cosplay project...
And we were off! With this last minute decision to go, we now only had about three months of working time. In combination with our full-time jobs and moving apartments halfway through the summer, we were in a pickle as to what to choose. Lightning As Cloud took roughly six months from conception to final, and with less than half that time, I was especially feeling the stress!

Luna, trident in hand, in the beautiful Leviathan stand-off
All I knew was that I wanted to make Lunafreya's trident from Final Fantasy XV- as soon as I saw it, I felt compelled to make it. To me, it was the perfect weapon of a goddess, and such a unique piece within the Final Fantasy universe amongst the larger-than-life brute force swords and impossibly baroque gunblades and staffs (which I adore as well-don’t get me wrong!). With that, especially coming off 2016’s Fusion Sword, this piece felt like the right creative direction to take.
Blueprint and Concept

Luna's figure- on my wish list (along with Aranea)!
I primarily used the product images for Luna’s Play Art Kai action figure to map out my initial dimensions and drawings I would later bring into SolidWorks. I tried to stick to one reference this time around, as to not be bogged down by discrepancies across images. While working on the Buster Sword, I found myself overwhelmed by my drive for accuracy that it really threw my focus, and made me heavily question my design decisions. This time around, I wanted to trust my instincts more, and give myself more room to interpret than I had last time.
I set out to design all the pieces to slide onto a one inch PVC pipe, so I would have some working room once I had all my prints. I still was not set on the overall size of the trident itself- and you never entirely know what you are going to get out the printer until you receive your prints- so I felt I had enough of a pliable foundation at this point to begin working on my models.
Modeling
The modeling portion of this was quite straightforward, and my most successful SolidWorks build to date, despite some setbacks.

I began with the trident’s “head,” with started off as an extrusion of a vector drawing that was then heavily filleted and chamfered on the edges to create the main shape. I then built off and around this shape to create the other panels. This whole build exemplifies the power of the mid-plane extrusion, for it increased the overall speed of my build and made any mirroring a breeze!


The most time-consuming (and RAM crunching part) of this build was the spiral designs. I first modeled several spiral patterns using a combination of arcs, lines, and offsets, then create construction lines over which I mirrored those sketches. I then extruded them to confirm that they would work, then lathered, rinsed and repeated. The more spirals I made, the more complicated my sketch got, and I had to be very detail-oriented and deeply on watch to make sure that I had clean, sensical line work in the midst of all the relationships.


All that see-through action= red light!
Nonetheless, I still ran into rebuild issues, and my work time significantly slowed as my computer nearly set itself on fire to process the details!
By the end of its construction, the model was imperfect- I had a mysterious problem with the head that I was unable to identify due to the shear amount of information in the file. I exported what I had and ran a default repair in Netfabb Basic, which luckily resolved the issue without affecting the look of my file.


The bottom “stake” was built using the same process as the head, and the smaller fittings were all built using either lofts or revolutions, finished off with chamfers or fillets.

I only had to use ZBrush once in this build, and that was to create the wing for one of the bottom fittings. I then brought the SolidWorks part into ZBrush, where I married the two via Dynamesh. I especially loved making this piece, for I am a sucker for ZBrush!
Printing


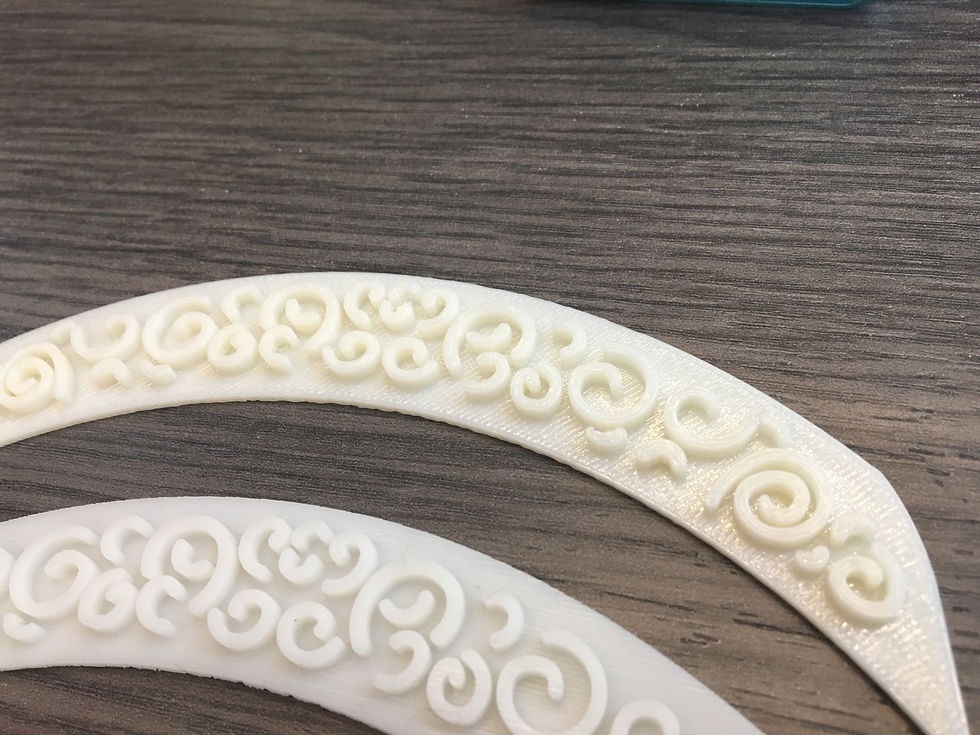
In all images: Top Sample, Fortus, Bottom Sample, 7000
I did two test prints on the LaGuardia Studio's Projet 7000 SLA printer and Fortus 450 MC FDM Printer to compare. Both machines use two different processes that yield very different results, so it was interesting to see the treatment of the same information.
I have used the 7000 for almost all of my larger cosplay pieces, so I know that material very well and how to yield beautiful results from it. Overall, the material has higher definition, and its surface quality is so smooth, that it requires less post-production time. However, you get what you pay for, and this material is expensive. It is also quite brittle, causing it to chip and shatter under different environmental conditions, making it a bit precarious for the sharp edges needed for these trident pieces.
The Fortus prints were a pleasant surprise. The detail of my test piece held up quite well despite its lower resolution, and I could immediately feel the difference in durability; it had more of a flex compared to that of the 7000. The cost was also shocking- for all of my trident pieces, it would cost as much as my trident head alone on the 7000!
In my heart, I knew I wanted the 7000- it had my ideal look, and I had comfort in my experience working with it. But at its price, reliant durability, and my desire to try something new, I ended up moving to final on the Fortus.
Prints
Click on an image to open up the Gallery view!


I recently got my prints and I have to say- not bad! Due to the lower print cost, I decided to go with printing them in a vertical orientation for the smoothest striations, and I am so glad I did. the fittings look fantastic, and I loved how much detail the wing held.
My Head and Stake probably have the most “issues.” The spirals on the head got a bit crunchy, with some of them not even printing. Part of this comes from a model issue, for I did a lot of mirroring, and could easily have missed floating pieces amidst that looming rebuild issue I supposedly resolved. I also really pushed the lower resolution print head with the fine details of the spirals. I am currently working on printing spirals to glue onto the head, and figure out how I am going to fill in the gaps in some of the other areas.
I tried to shell my pieces more efficiently this time around, but nonetheless the shape of the the Stake created some precarious thinner areas. I am not terribly worried about these, but will see once I get to prepping for paint whether or not I will attempt to reinforce these areas.

Speaking of painting, that is my next step in this process, so stay tuned to for future Comic Con Chronicle posts!
This should be interesting…
Let me know in the comments your experiences with FDM printing of larger parts, and design decisions you make to yield the best results!


Comments